


Introduction
Setting up a reliable and redundant DNS-based ad-blocking system can feel like a complex undertaking, but with Docker and a structured approach, it's entirely achievable. In this guide, I’ll walk you through creating a dual Pi-hole setup using two network interfaces (NICs), ensuring your network remains resilient and efficient. This isn't just about blocking ads; it’s about building a fault-tolerant system that keeps your network running smoothly, even when one part of the setup encounters issues. By the end, you’ll have a scalable solution that works for both small home networks and larger environments.
We’ll start by preparing the necessary prerequisites, which include setting up Docker, configuring environment files, and creating a robust folder structure to house your Pi-hole instances. Using Docker Compose, I'll show you how to deploy two independent Pi-hole containers, each running on its own NIC, to achieve redundancy. You’ll also learn how to customize DNS records, optimize your settings through the WebUI, and ensure the system is tailored to your specific network needs. This setup is designed with flexibility in mind, so you can easily adapt it as your network evolves.
What makes this approach effective is its simplicity combined with Docker’s powerful containerization capabilities. You don’t need to be a networking expert to follow this guide—just an understanding of DNS basics and some familiarity with Docker commands. The end result is a highly available system designed to minimize downtime while providing seamless ad-blocking. Whether you're looking for a dependable solution for your home or a professional-grade setup for a larger network, this guide has you covered. I hope this post empowers you to take control of your network and create a system you can rely on.
References
Prerequisites
- Internet Connection
- Up-to-date Server
- Proper permissions to run Docker commands
- Docker Setup - Ultimate Docker Guide
- Sudo Privileges
Container Setup
Creating the Directories
mkdir -p /data/dns/pihole2/etc-pihole
mkdir -p /data/dns/pihole1/etc-pihole
mkdir -p /data/dns/pihole1/etc-dnsmasq.d
mkdir -p /data/dns/pihole2/etc-dnsmasq.d

chown user:data -R /data/dns
chmod 775 -R /data/dns
Docker Environment Setup
nano /data/dns/.env

PIHOLE_PASSWORD='pihole password'

# Use Control+O to save and Control+X to exit
nano /data/dns/docker-compose.yaml
# Use Control+O to save and Control+X to exit
services:
  pihole1:
    image: pihole/pihole:latest
    container_name: pihole1
    ports:
      - "192.168.2.24:53:53/tcp"
      - "192.168.2.24:53:53/udp"
      - "192.168.2.24:41807:80/tcp"
      - "192.168.2.24:41808:443/tcp"
    environment:
      - TZ=America/New_York
      - FTLCONF_webserver_api_password=${PIHOLE_PASSWORD}
      - FTLCONF_dns_upstreams=9.9.9.9;1.1.1.1
      - FTLCONF_dns_listeningMode=all
    volumes:
      - /data/dns/pihole1/etc-pihole:/etc/pihole
      - /data/dns/pihole1/etc-dnsmasq.d:/etc/dnsmasq.d
    restart: unless-stopped
    cap_add:
      - NET_ADMIN
      - SYS_TIME
      - SYS_NICE
      - CHOWN

  pihole2:
    image: pihole/pihole:latest
    container_name: pihole2
    ports:
      - "192.168.2.25:53:53/tcp"
      - "192.168.2.25:53:53/udp"
      - "192.168.2.25:41809:80/tcp"
      - "192.168.2.25:41810:443/tcp"
    environment:
      - TZ=America/New_York
      - FTLCONF_webserver_api_password=${PIHOLE_PASSWORD}
      - FTLCONF_dns_upstreams=9.9.9.9;1.1.1.1
      - FTLCONF_dns_listeningMode=all
    volumes:
      - /data/dns/pihole2/etc-pihole:/etc/pihole
      - /data/dns/pihole2/etc-dnsmasq.d:/etc/dnsmasq.d
    restart: unless-stopped
    cap_add:
      - NET_ADMIN
      - SYS_TIME
      - SYS_NICE
      - CHOWN
Custom List
If you have domains that you want to resolve, you should run the following commands per server and per domain. Then modify the pihole.toml file for said domains.
echo "local=/example.xyz/" | tee /data/dns/pihole1/etc-dnsmasq.d/02-custom.conf
echo "local=/example.xyz/" | tee /data/dns/pihole2/etc-dnsmasq.d/02-custom.conf
In the [dns] section, there is a custom dns area. Use this to input your custom dns records:
nano /data/dns/pihole1/etc-pihole/pihole.toml

# Array of custom DNS records
# Example: hosts = [ "127.0.0.1 mylocal", "192.168.0.1 therouter" ]
#
# Possible values are:
#     Array of custom DNS records each one in HOSTS form: "IP HOSTNAME"
hosts = [
    "192.168.2.24 git.example.xyz",
    "192.168.2.10 chat.example.xyz",
] ### CHANGED, default = []

# Use Control+O to save and Control+X to exit
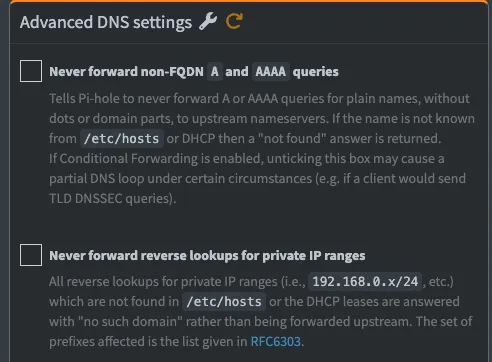
In the WebUI, you want to switch to expert mode and go into the DNS settings. These two options need to be unchecked:
Conclusion
Setting up a redundant Pi-hole configuration using Docker and two network interfaces is an excellent way to ensure continuous and reliable DNS-based ad blocking for your network. By leveraging Docker's flexibility, you can easily manage two independent Pi-hole instances, ensuring high availability and redundancy. This guide has walked you through the process of configuring the necessary environment, creating a Docker Compose file, and customizing DNS records to suit your specific needs. With properly configured network interfaces and a robust folder structure, your system is designed to handle DNS requests seamlessly, even in the event of a single point of failure.
This setup not only enhances your network’s performance but also provides the peace of mind that comes with a fault-tolerant DNS solution. By following the steps outlined, including the customization of DNS records and Docker environment variables, you have built a scalable and reliable system. Whether you're looking to manage a home network or a larger environment, this approach ensures that your network remains secure, efficient, and free from unwanted content interruptions. With the power of Docker, maintaining and scaling this setup becomes straightforward, making it an ideal solution for anyone seeking an advanced yet manageable ad-blocking system.
Full Disclosure
Most of this article is comprised of facts and opinions. AI (specifically Grok and Notion AI) was used in the creation of this post. The featured background image was created by andyoneru and is available on Unsplash. I added a blur and a gradient overlay with some text. The following images have been pulled or screenshotted from the respective websites/applications. I do not own this content.